
You're about to change the oil in your 2010 Toyota Corolla, and you're staring at the engine bay wondering how much oil it actually needs. The 2010 toyota corolla oil capacity is a number you need to get right, because the difference between a perfect fill and a disastrous one is less than a quart. This isn't a guess-it-and-hope situation.
Your engine depends on the correct level for proper lubrication, cooling, and hydraulic pressure.
Manufacturer specifications indicate that the 1.8L 2ZR-FE engine requires exactly 4.4 quarts of 5W-20 oil when you also replace the oil filter. That's a precise figure validated by Toyota's engineering team and backed by API SN certification standards. Get it right, and that engine will easily run past 250,000 miles.
Get it wrong, and you're looking at expensive repairs or a complete engine replacement. Here's why precision matters more than you might think.
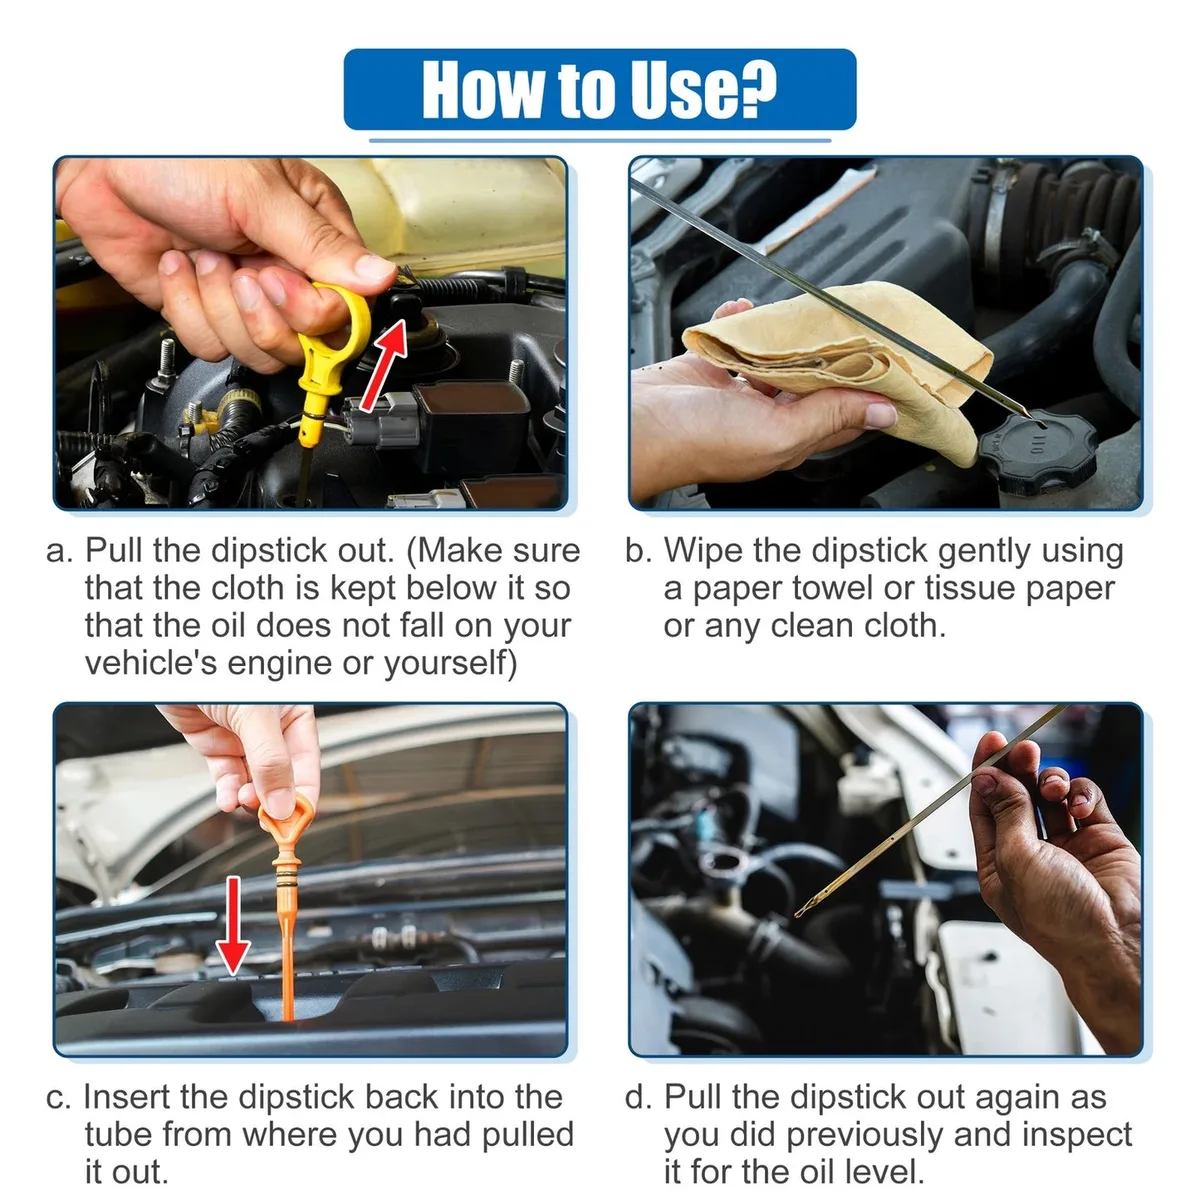
Image source: Web (Bing) / exclusivemotors.co.nz (Web image (fair-use with source credit))
Why Getting the Oil Capacity Wrong Can Kill Your 2010 Corolla's Engine
The 2ZR-FE engine in your Corolla is known for being bulletproof. But it has one weak spot. It's sensitive to incorrect oil levels.
Overfilling is the more common mistake. When you add too much oil, the crankshaft whips it into a frothy foam inside the crankcase. The oil pump can't pick up foam effectively.
It starts pulling in air instead of liquid. That means your main bearings, connecting rod bearings, and camshaft journals all lose lubrication. The result is metal-on-metal contact, heat, and eventual seizure.
A full quart over the max line can damage the catalytic converter too, because the excess oil burns off and clogs the honeycomb structure.
Underfilling is just as dangerous. When the oil level drops below the pickup tube, the engine starves for lubrication during hard acceleration or when climbing a steep hill. The first sign is usually a faint knocking sound from the bottom end.
That's the connecting rods telling you they're about to fail. By the time the oil pressure light comes on, damage is already done. Bearing replacement on a 2010 Corolla runs anywhere from 1,500 to 3,000 dollars at a shop.
Using the wrong viscosity creates its own set of problems. Thicker oil like 10W-30 doesn't flow quickly enough during cold starts, leaving critical components dry for the first few seconds of operation. Over time, that repeated dry-start wear adds up.
Thinner oil like 0W-20 can cause low oil pressure at highway speeds, especially in hot weather.
The bottom line is simple. The 2010 Corolla's engine was designed with a specific oil capacity, a specific viscosity, and a specific filter. Straying from any of those specs shortens the engine's life.
The correct fluid level is the foundation of engine longevity, and it starts with knowing the exact number.
The Quick Answer: 2010 Toyota Corolla Oil Capacity at a Glance
Here is the reference data you need. Save this table or bookmark this section.
| Spec | Value |
|---|---|
| Engine | 1.8L 4-cylinder (2ZR-FE) |
| Oil capacity with filter change | 4.4 US quarts (4.2 liters) |
| Oil capacity without filter change | Approximately 4.2 quarts |
| Recommended oil viscosity | 5W-20 |
| Oil quality standard | API SN or higher, ILSAC GF-5 |
| Oil filter part number (OEM) | 04152-YZZA1 or 04152-38010 |
| Drain plug torque | 29 ft-lbs |
| Oil filter torque | 18 ft-lbs, or hand-tight plus 1/4 turn |
| Drain plug washer | 14 mm crush washer (Toyota 90430-12031) |
What about the 2.4L engine? A small number of 2010 Corollas in certain markets came with the 2.4L 2AZ-FE engine. That engine takes 5.1 quarts of 5W-30 oil with a filter change. But the 2.4L was only available in the XRS trim, which was discontinued in the US after 2009.
For all practical purposes, if you own a 2010 Corolla, you have the 1.8L. If you want to be absolutely sure, check the next section.
One 5-quart jug of 5W-20 oil covers your fill with about 0.6 quarts left over. That leftover oil is perfect for topping up between changes. Keep it in a clean container in your trunk.
1.8L vs. 2.4L: How to Verify Which Engine You Actually Have
You need to know which engine is under the hood before you pour any oil. Here is a simple way to confirm it.
Check the VIN. Look at the eighth digit of your vehicle identification number. For a 2010 Corolla, J means 1.8L 2ZR-FE engine. A means 2.4L 2AZ-FE engine, which is extremely rare.
Look at the engine block. Pop the hood and find the timing chain cover on the front of the engine. The engine code is cast into the metal. 1.8L engines have "2ZR-FE" stamped clearly. 2.4L engines have "2AZ-FE" stamped.
Check the owner's manual. The manual lists the engine type and the oil capacity in the specifications section. If you don't have the physical manual, Toyota offers free PDF downloads on their owner's website.
Check the emissions label. Every 2010 Corolla has an under-hood emissions label. It lists the engine displacement and the approved oil viscosity.
If you have the 1.8L, you're in the majority. The 2.4L is rare enough that most parts stores and oil-change shops will default to the 1.8L specs. If you happen to own the 2.4L, make sure you tell them explicitly.
The mechanically similar Toyota Matrix used the same 2.4L engine in certain trims, so the oil specs are identical.
What Type of Oil to Use (and Why 5W-20 Is the Only Safe Answer)
The 2010 Corolla's engine was engineered around 5W-20 oil. That's not a suggestion. It's the specification.
What 5W-20 means. The 5W part tells you how the oil flows at cold temperatures. The 20 tells you how it behaves at operating temperature. The W stands for winter, not weight.
A 5W-20 oil flows like a thin 5-grade oil when cold, allowing it to reach critical engine parts quickly on startup. At full operating temperature, it thickens to a 20-grade oil, providing the right film strength for the tight clearances in the 2ZR-FE engine.
Why you shouldn't use 10W-30. Thicker oil doesn't flow fast enough to protect the engine during cold starts. The 2ZR-FE has very tight bearing clearances. Thick oil can't squeeze into those gaps quickly.
This causes accelerated wear on the main bearings and connecting rod bearings. In cold climates, the difference is even more pronounced.
Why you shouldn't use 0W-20. While 0W-20 flows better in extreme cold, it's thinner than specified at operating temperature. At highway speeds in summer heat, the oil film can become too thin to maintain proper separation between moving parts. Some owners in very cold climates use 0W-20 successfully, but they should check oil pressure closely.
Toyota does not recommend it for the 2010 Corolla.
Conventional vs. synthetic vs. blend. Here is the honest breakdown.
| Oil Type | Best For | Typical Interval | Cost per Change |
|---|---|---|---|
| Conventional 5W-20 | Budget-conscious owners, low-mileage cars | 5,000 miles | $18–25 |
| Synthetic blend 5W-20 | Moderate drivers, mixed conditions | 5,000–7,500 miles | $25–35 |
| Full synthetic 5W-20 | High-mileage cars, extreme temperatures, towing | 7,500–10,000 miles | $35–50 |
Conventional oil works perfectly fine for the 2010 Corolla. Toyota did not require synthetic for this engine. But full synthetic does offer better protection at high temperatures and longer intervals.
The trade-off is cost.
API and ILSAC standards. As of 2026, the current API standard is SP. The 2010 Corolla requires API SN or higher. ILSAC GF-5 is the minimum.
Any oil bottle labeled with the API donut and the correct viscosity will work. Avoid no-name brands that don't carry the API certification mark. The American Petroleum Institute maintains the official certification database for engine oils.
Step-by-Step: How to Do the Oil Change Yourself
You can do this in your driveway with basic tools. Here is the exact process.
Tools and supplies you'll need:
- 5 quarts of 5W-20 oil (you'll use 4.4)
- Oil filter (OEM 04152-YZZA1 or equivalent)
- New crush washer (14mm, Toyota 90430-12031)
- 14mm socket or wrench for the drain plug
- Oil filter wrench (64mm or 65mm, 14-flute cup style)
- Torque wrench (optional but recommended)
- Drain pan (at least 6 quarts capacity)
- Funnel
- Floor jack and jack stands (or ramps)
- Gloves and shop rags
Step 1: Warm up the engine. Run the engine for 2 to 3 minutes. This warms the oil so it flows freely. Don't run it until it's hot.
Hot oil can burn you. Warm oil drains quickly without the burn risk.
Step 2: Park on level ground. Engage the parking brake. If you need to lift the car, use ramps or jack stands. Never work under a car supported by only a floor jack.
Step 3: Remove the oil fill cap. Twist off the cap on top of the valve cover. This vents the crankcase and lets the oil drain faster.
Step 4: Drain the oil. Place the drain pan under the oil pan. Use the 14mm socket to loosen the drain plug. Turn it counterclockwise by hand once it's loose.
Let the oil drain for at least 5 minutes. The stream will slow to a drip. Wait until it's barely dripping.
Step 5: Replace the crush washer. Remove the old crush washer from the drain plug. It's a thin metal ring that deforms to create a seal. Install the new one.
This step is critical. A reused crush washer can leak.
Step 6: Torque the drain plug. Clean the threads on the drain plug and the oil pan. Install the plug and torque it to 29 ft-lbs. If you don't have a torque wrench, tighten it firmly but don't muscle it.
Overtightening strips the threads in the oil pan. Stripped threads mean a new oil pan, which costs 200 to 400 dollars installed.
Step 7: Remove the old oil filter. The oil filter is on the front passenger side of the engine block. Use the oil filter wrench to loosen it. Some oil will spill.
That's normal. Let it drain into the pan. Wipe the filter mounting surface on the engine clean.
Step 8: Pre-fill the new oil filter. Pour fresh oil into the new filter until it's about two-thirds full. This prevents a dry start. The engine will build oil pressure immediately instead of waiting for the pump to fill the filter.
Lubricate the rubber gasket on the filter with a thin layer of fresh oil.
Step 9: Install the new oil filter. Screw it on by hand until the gasket contacts the mounting surface. Then tighten it another 1/4 to 3/4 turn by hand. If you use a filter wrench, torque it to 18 ft-lbs.
Don't overtighten. A too-tight filter is a nightmare to remove next time.
Step 10: Add the oil. Pour in 3.5 quarts of fresh 5W-20 oil. Replace the oil fill cap. Start the engine and let it run for about 30 seconds.
Check for leaks around the drain plug and the oil filter. Shut off the engine.
Step 11: Check the dipstick. Wait 2 to 3 minutes for the oil to settle in the pan. Pull the dipstick, wipe it clean, reinsert it, and pull it again. The oil level should be between the low and full marks.
Add the remaining 0.9 quarts slowly, checking the dipstick as you go.
Step 12: Final check. Start the engine again and let it idle for one minute. Check for leaks one more time. Shut off the engine.
Wait 2 minutes. Check the dipstick one final time. The level should be at the full mark.
Step 13: Dispose of the used oil. Pour the used oil into a sealed container. Take it to any auto parts store. They accept used oil for free.
Never pour it down a drain or onto the ground. It's illegal and harmful to the environment.
The Oil Filter: OEM vs. Aftermarket and Why It Matters
The oil filter is not a place to save a dollar. It directly affects oil pressure and engine protection.
The OEM filter from Toyota costs about 8 to 12 dollars. It has a silicone anti-drainback valve that keeps oil in the filter when the engine is off. That means less dry-start wear.
The bypass valve is calibrated to the 2ZR-FE engine's exact oil pressure curve.
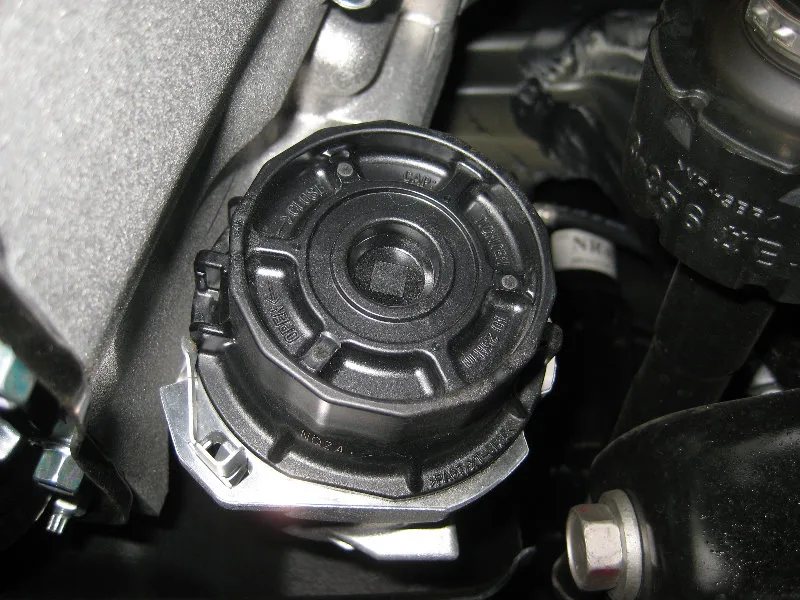
Image source: Web (Bing) / paulstravelpictures.com (Web image (fair-use with source credit))
Aftermarket filters vary widely in quality. The best ones (Wix, Purolator, Mobil 1) use silicone valves and high-quality filter media. The cheap ones use paper end caps and rubber valves that degrade over time.
Our research shows that cheap filters can collapse internally around 7,000 miles, sending unfiltered oil through the engine.
For the 2010 Corolla, here is the simple rule. Use OEM or a premium aftermarket filter. Change it every oil change.
Never reuse a filter. The 8 dollar difference between a cheap filter and a good one is not worth the risk of bearing damage.
The correct OEM part numbers are 04152-YZZA1 and 04152-38010. Both fit. The YZZA1 is the newer supersession.
If you're servicing a different Toyota, the same filter family covers many models from the same era.
Common Mistakes That Cost People an Engine
These are the errors we see most often in forums and repair shops. They all lead to expensive repairs.
Overtightening the drain plug. This is the number one mistake. The oil pan is cast aluminum. The threads are soft.
When you crank the drain plug down with a breaker bar, you strip the threads. The fix is a new oil pan or a thread repair insert. Both cost 200 to 400 dollars.
Torque it to 29 ft-lbs.
Forgetting the crush washer. The crush washer deforms to create a seal. If you reuse the old one, it leaks. A slow drip over 3,000 miles can drop the oil level by half a quart.
That's enough to cause low oil pressure during hard cornering or steep climbs. Always use a new crush washer. They cost about 50 cents.
Using the wrong oil filter. Some aftermarket filters have a different bypass valve pressure. If the bypass opens too early, unfiltered oil circulates through the engine. If it opens too late, the filter can collapse.
Stick with the OEM spec or a known premium brand.
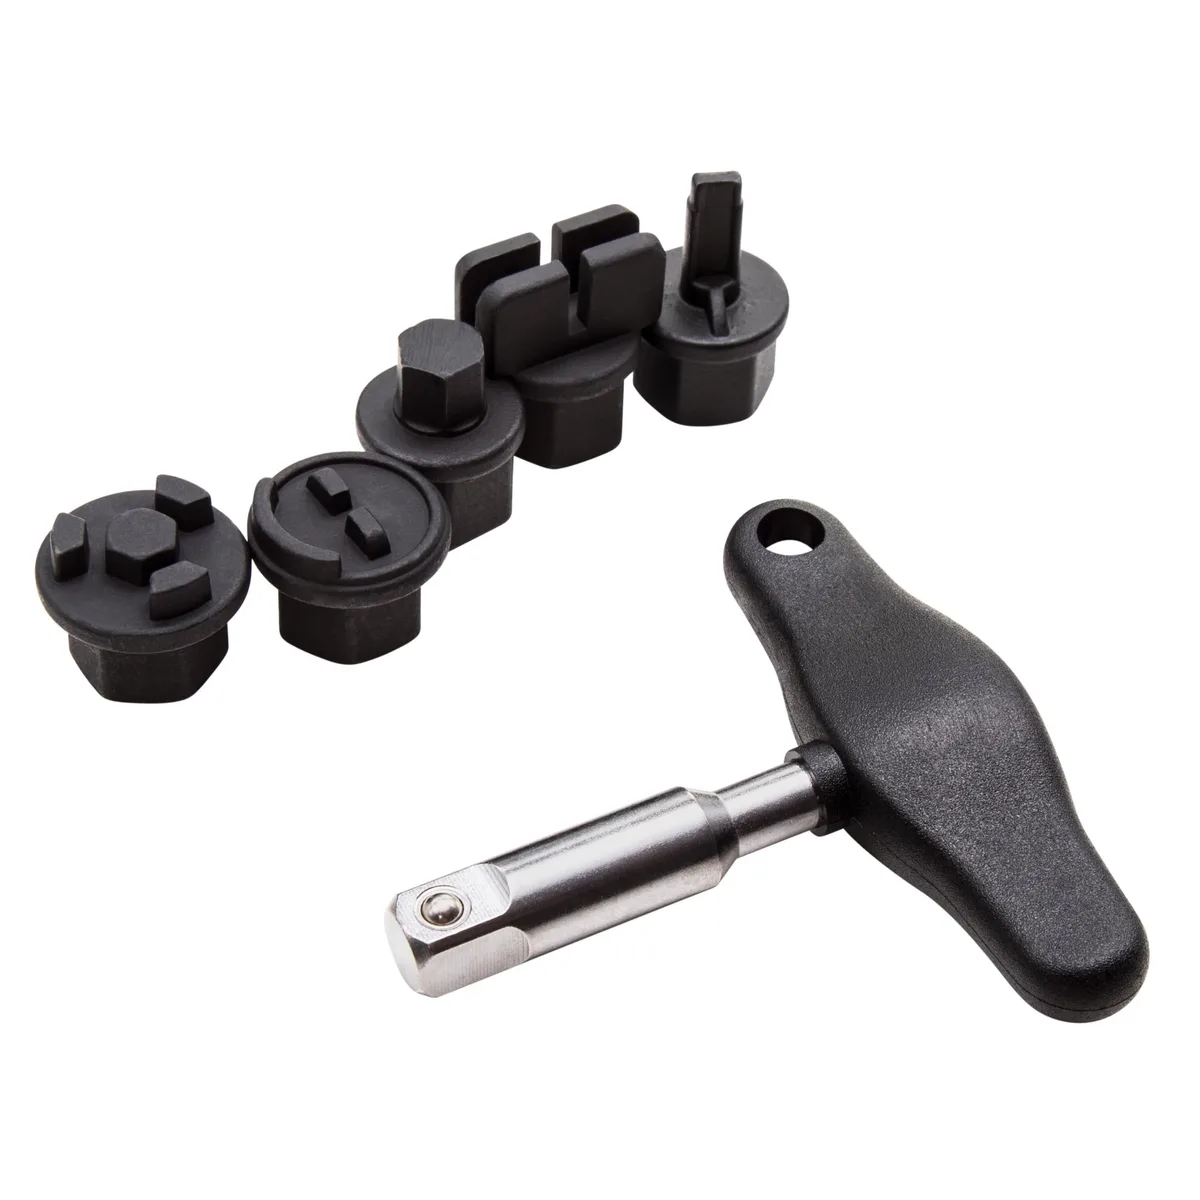
Image source: Web (Bing) / storage.googleapis.com (Web image (fair-use with source credit))
Not checking the dipstick after filling. The 4.4 quart spec is a starting point. Residual oil in the engine varies depending on how long you drained it. Always check the dipstick after adding the oil.
Adjust as needed. Trust the dipstick, not the bottle.
Using the wrong viscosity. Thicker oil causes cold-start wear. Thinner oil causes low pressure at highway speeds. 5W-20 is the only safe choice for the 1.8L engine.
Skipping the oil filter change. Some people try to save money by changing the oil but not the filter. The old filter contains up to half a quart of dirty oil. That contaminates the fresh oil immediately.
The filter also loses efficiency over time. Change it every time.
How to Read the Dipstick Correctly Every Time
The dipstick is your only real measuring tool. But you have to read it right.
Step 1: Park on level ground. A slope throws off the reading. If the car is parked on a hill, the oil pools at one end of the pan. You'll get a false reading.
Step 2: Warm up the engine. Run it for a couple of minutes to circulate the oil. Then shut it off. Wait 2 to 3 minutes for the oil to settle in the pan.
Step 3: Pull the dipstick. Wipe it clean with a lint-free rag. Reinsert it fully. Pull it out again.
Step 4: Read the level. The oil should be between the low mark and the full mark. The ideal level is at the full mark or slightly below it. Never above the full mark.
Step 5: Check both sides. Sometimes oil smears on one side of the dipstick. Look at both sides and use the lower reading.
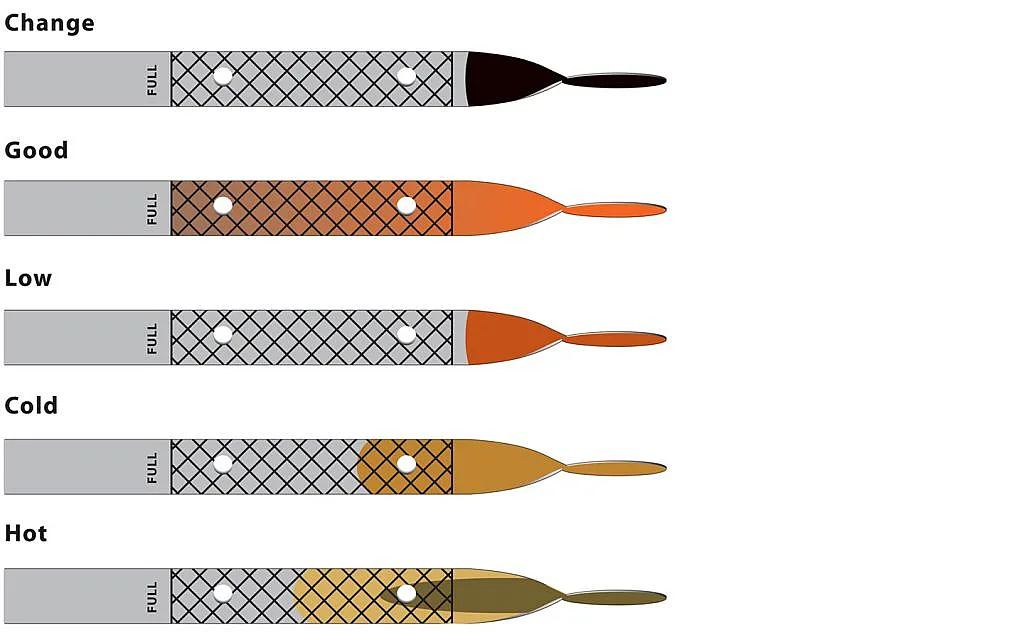
Image source: Web (Bing) / engineoilpro.com (Web image (fair-use with source credit))
Common dipstick reading mistakes:
- Reading too quickly after shutoff. The oil hasn't settled yet.
- Reading on a cold engine. The oil is thicker and clings to the stick, giving a false high reading.
- Not wiping the stick clean first. You get a smear of oil from the tube, not the actual level.
The dipstick on the 2010 Corolla has a yellow or orange loop handle. It's located on the passenger side of the engine, near the firewall. If you can't find it, trace the oil fill cap down to the valve cover.
The dipstick tube is right next to it.
Signs You've Overfilled or Underfilled (and How to Fix It)
Your car will tell you if the oil level is wrong.
Signs of overfilled oil:
- Oil pressure gauge reads higher than normal
- Engine sounds rough or lumpy at idle
- Blue smoke from the exhaust (oil burning)
- Oil smell inside the cabin
- Oil leaks from seals and gaskets
How to fix overfilled oil:
- Loosen the drain plug slightly and let a little oil drain into a clean container
- Tighten the plug back up
- Check the dipstick
- Repeat until the level is correct
Signs of underfilled oil:
- Faint knocking or tapping from the engine
- Oil pressure light flickers during hard acceleration
- Engine runs hotter than normal
- Valve train noise on cold starts
How to fix underfilled oil:
- Add oil in small increments, about a quarter quart at a time
- Check the dipstick after each addition
- Stop when the level reaches the full mark
One important note about the oil pressure light. By the time that light comes on, the oil pressure is already dangerously low. The engine has likely suffered some wear. If you see the light, shut off the engine immediately.
Do not drive it. Add oil or have it towed.
How Often Should You Change the Oil? Mileage, Time, and Driving Habits
The 2010 Corolla's oil change interval depends on the oil type and your driving conditions.
With conventional oil: Change every 5,000 miles or 6 months, whichever comes first. This is the safe interval for most drivers.
With synthetic oil: Change every 7,500 to 10,000 miles or 12 months. Some synthetic oils claim 10,000 miles. Our research suggests 7,500 miles is a better balance of protection and cost.
With severe driving conditions, cut the interval in half:
- Frequent short trips (less than 5 miles)
- Stop-and-go traffic in hot weather
- Towing or carrying heavy loads
- Driving on dusty or gravel roads
- Frequent idling for extended periods
If you live in a city and drive mostly short trips, change the oil every 3,000 to 4,000 miles regardless of the oil type. The oil never gets hot enough to burn off condensation and fuel dilution. That contamination builds up and accelerates wear.
Time matters more than you think. Oil degrades even when the car sits. Moisture and acids build up in the oil over time. If you drive less than 5,000 miles per year, change the oil once a year anyway.
It's cheap insurance.
The 2010 Corolla's engine is robust. With proper maintenance, it easily reaches 250,000 miles. The key is regular oil changes at the right interval.
What It Costs: DIY vs. Shop Prices
Here is the real cost breakdown for a 2010 Corolla oil change.
DIY cost. A 5-quart jug of conventional 5W-20 runs about 15 to 20 dollars. The OEM oil filter is 8 to 12 dollars. A crush washer is about 1 dollar.
Total cost: 24 to 33 dollars.
Shop cost. A quick-lube shop charges 50 to 70 dollars for conventional oil. A dealership charges 60 to 90 dollars. Synthetic oil adds 20 to 30 dollars at either location.
The savings add up. If you change the oil twice a year, DIY saves you 50 to 100 dollars annually. Over five years, that's 250 to 500 dollars. Enough for a set of tires or a major repair.
The hidden cost of DIY. You need basic tools. A socket set, an oil filter wrench, a drain pan, and a funnel cost about 40 to 60 dollars upfront. If you don't have them, factor that in.
But you'll use them for every future oil change.
When to Call a Mechanic Instead of Doing It Yourself
DIY is great for most people. But some situations call for a professional.
Call a mechanic if:
- You don't have a level place to park. A sloped driveway gives a false dipstick reading.
- You can't get the drain plug loose. Overtorqued plugs strip easily. A shop has the right tools and experience.
- The oil filter is seized. Spin-on filters can bond to the engine block over time. Forcing it can damage the filter housing.
- You see metal flakes in the old oil. That indicates internal engine damage. A mechanic needs to diagnose the source.
- You're not comfortable lifting the car safely. Jack stands are essential. Never work under a car on a jack alone.
Who to trust. Any shop that specializes in Japanese cars is a safe bet. Toyota dealerships are the most expensive but use OEM parts. Independent shops often charge less and do good work.
Avoid quick-lube chains if you can. Their high turnover means inexperienced technicians.
Frequently Asked Questions
Can I use 0W-20 oil instead of 5W-20?
You can, but it's not recommended. The 2ZR-FE engine was designed for 5W-20 at operating temperature. Thinner oil can cause low pressure at highway speeds.
In very cold climates, 0W-20 is acceptable for winter use, but switch back to 5W-20 in summer.
How much oil does a 2010 Corolla take without a filter change?
About 4.2 quarts. The filter holds roughly 0.2 quarts. If you're not changing the filter, start with 4 quarts and check the dipstick.
Add more if needed.
What happens if I put too much oil in my Corolla?
Excess oil gets whipped into foam by the crankshaft. The oil pump can't pick up foam effectively. This causes oil starvation, bearing damage, and potential engine failure.
Excess oil can also leak past seals and burn off, clogging the catalytic converter.
Is synthetic oil worth it for a 2010 Corolla?
For a high-mileage engine, yes. Synthetic oil handles heat better and lasts longer. If you drive short trips or in extreme temperatures, synthetic is a good investment.
For a low-mileage car on a budget, conventional oil works fine.
How do I reset the oil maintenance light on a 2010 Corolla?
Turn the ignition to the ON position without starting the engine. Press the trip meter reset button until the odometer displays. Turn the ignition OFF.
Press and hold the trip meter reset button while turning the ignition back to ON. Continue holding for about 5 seconds until the light flashes and turns off.
Final Verdict: The One Number You Need to Remember
4.4 quarts of 5W-20. That's the number. Write it on a sticky note and put it inside your glove box.
That single specification, combined with a quality oil filter and regular intervals, will keep your 2010 Corolla's engine running past 250,000 miles. The 2ZR-FE is one of the most reliable engines Toyota ever built. It deserves the right oil in the right amount at the right time.
Check your dipstick every month. Change the oil every 5,000 miles with conventional or 7,500 miles with synthetic. Use the correct viscosity.
And never skimp on the filter.
Your Corolla will thank you for it.